Git note
1. Git 原理和常用命令
1.1 5 Git workflows you can use to deliver better code and improve your development process
I haven’t met a developer who looked at a conflict message and did not pull their hair strands with frustration.
Trying to resolve each merge conflict is one of those things that every developer hates. Especially if it hits you when you’re gearing up for a production deploy!
This is where having the right Git workflow set up can do a world of good for your development workflow.
Of course, having the right git workflow will not solve all your problems. But it’s a step in the right direction. After all, with every team working remotely, the need to build features together without having your codebase getting disrupted is critical.
How you set it up depends on the project you’re working on, the release schedules your team has, the size of the team, and more!
In this article, we’ll walk you through 5 different git workflows, their benefits, their cons, and when you should use them. Let’s jump in!
1.1.1 Basic Git Workflow
The most basic git workflow is the one where there is only one branch — the master branch. Developers commit directly into it and use it to deploy to the staging and production environment.
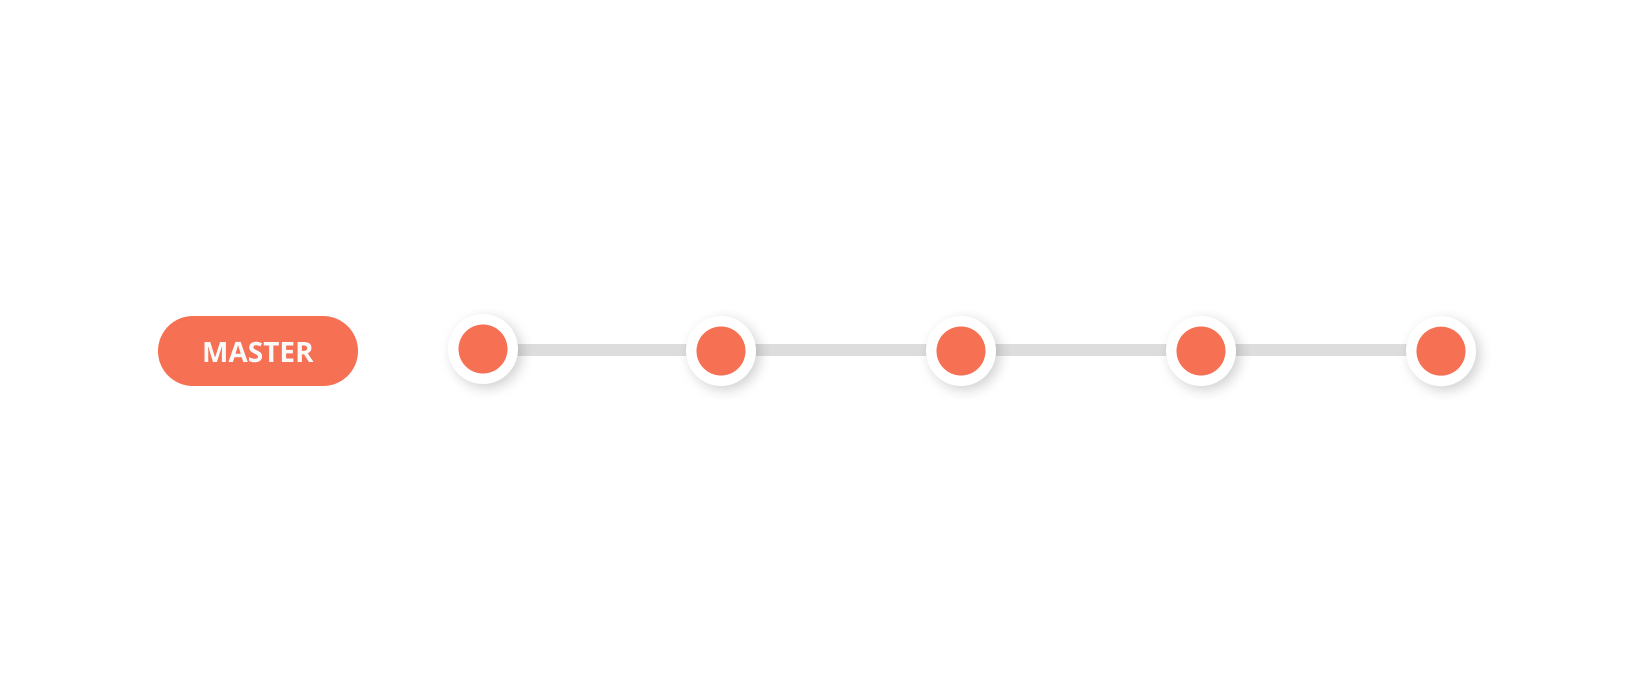
This workflow isn’t usually recommended unless you’re working on a side project and you’re looking to get started quickly.
Since there is only one branch, there really is no process over here. This makes it effortless to get started with Git. However, some cons you need to keep in mind when using this workflow are:
- Collaborating on code will lead to multiple conflicts.
- Chances of shipping buggy software to production is higher.
- Maintaining clean code is harder.
1.1.2 Git Feature Branch Workflow
The Git Feature Branch workflow becomes a must have when you have more than one developer working on the same codebase.
Imagine you have one developer who is working on a new feature. And another developer working on a second feature. Now, if both the developers work from the same branch and add commits to them, it would make the codebase a huge mess with plenty of conflicts.
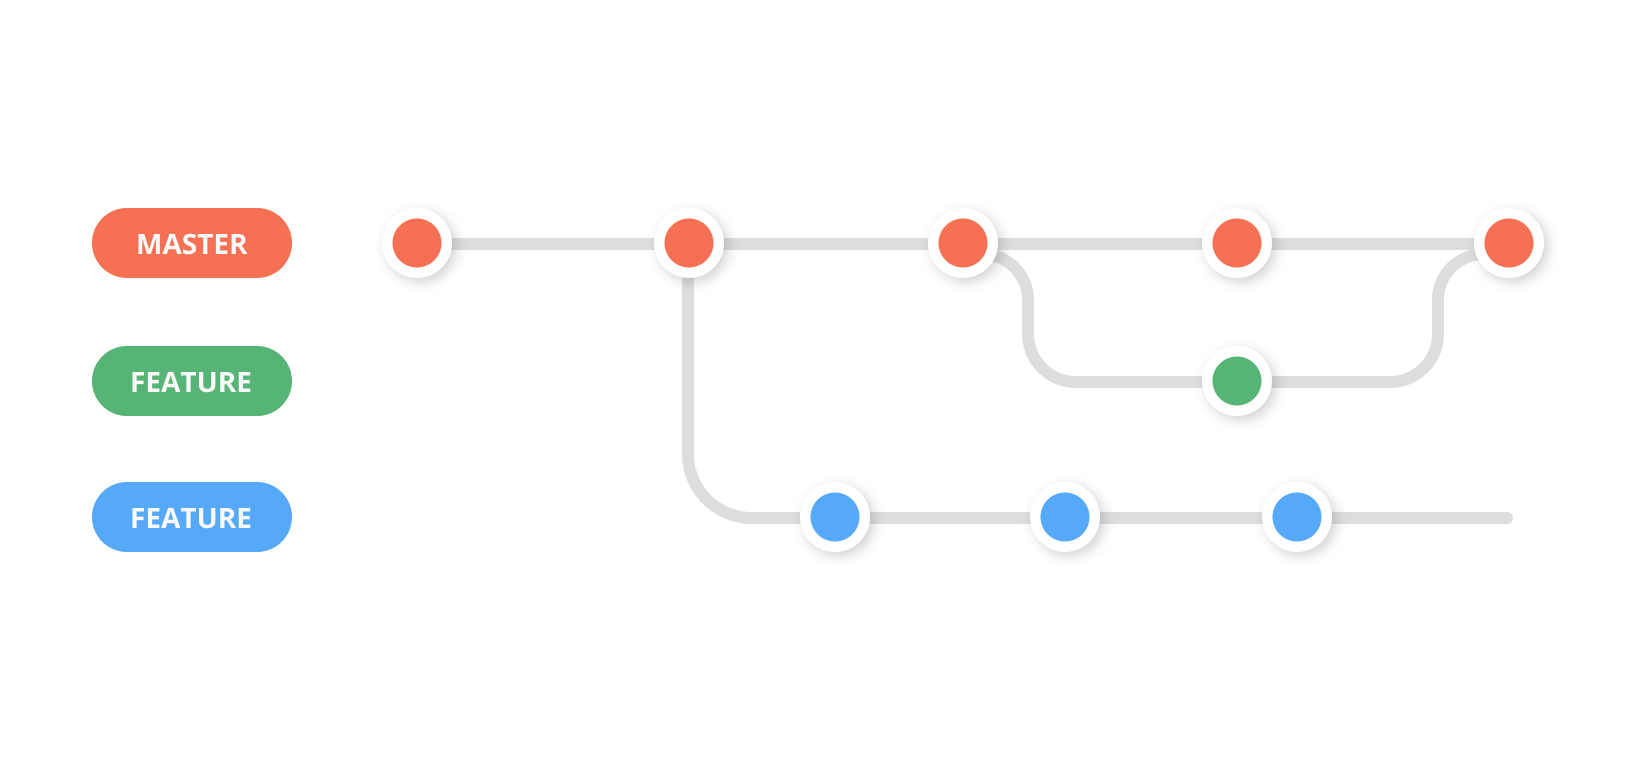
To avoid this, the two developers can create two separate branches from the master branch and work on their features individually. When they’re done with their feature, they can then merge their respective branch to the master branch, and deploy without having to wait for the second feature to be completed.
The Pros of using this workflow is, the git feature branch workflow allows you to collaborate on code without having to worry about code conflicts.
1.1.3 Git Feature Workflow with Develop Branch
This workflow is one of the more popular workflows among developer teams. It’s similar to the Git Feature Branch workflow with a develop branch that is added in parallel to the master branch.
In this workflow, the master branch always reflects a production-ready state. Whenever the team wants to deploy to production they deploy it from the master branch.
The develop branch reflects the state with the latest delivered development changes for the next release. Developers create branches from the develop branch and work on new features. Once the feature is ready, it is tested, merged with develop branch, tested with the develop branch’s code in case there was a prior merge, and then merged with master.
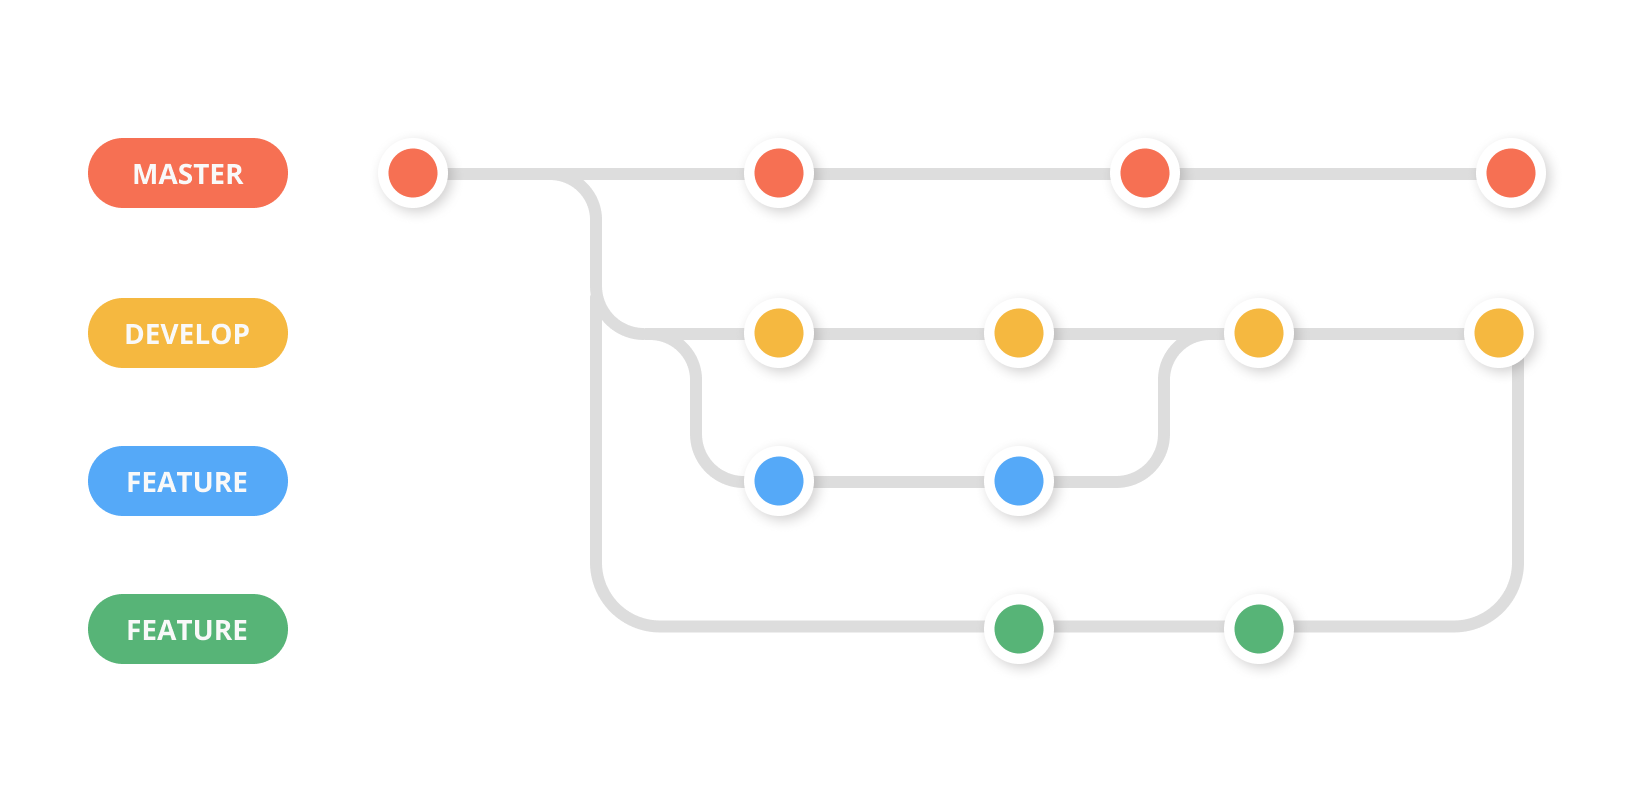
The advantage of this workflow is, it allows teams to consistently merge new features, test them in staging, and deploy to production. While maintaining code is easier, it can get a little tiresome for some teams since it can feel like going through a tedious process.
1.1.4 Gitflow Workflow
The gitflow workflow is very similar to the previous workflow we discussed combined with two other branches — the release branch and the hot-fix branch.
The hot-fix branch
The hot-fix branch is the only branch that is created from the master branch and directly merged to the master branch instead of the develop branch. It is used only when you have to quickly patch a production issue. An advantage of this branch is, it allows you to quickly deploy a production issue without disrupting others’ workflow or without having to wait for the next release cycle.
Once the fix is merged into the master branch and deployed, it should be merged into both develop and the current release branch. This is done to ensure that anyone who forks off develop to create a new feature branch has the latest code.
The release branch
The release branch is forked off of develop branch after the develop branch has all the features planned for the release merged into it successfully.
No code related to new features is added into the release branch. Only code that relates the release is added to the release branch. For example, documentation, bug fixes, and other tasks related to this release are added to this branch.
Once this branch is merged with master and deployed to production, it’s also merged back into the develop branch, so that when a new feature is forked off of develop, it has the latest code.
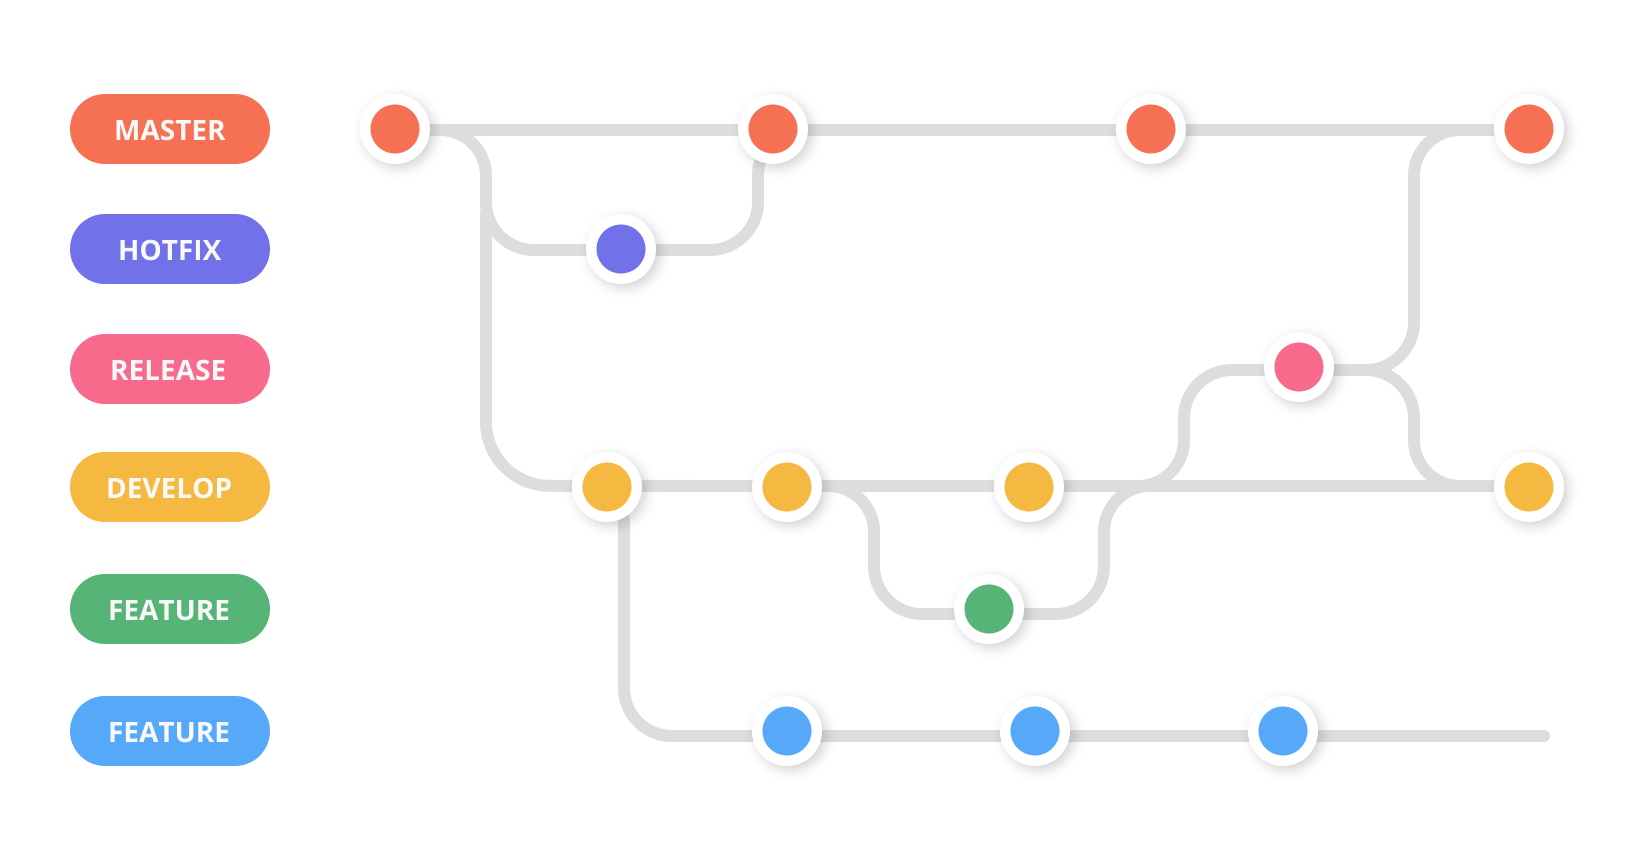
This workflow was first published and made popular by Vincent Driessen and since then it has been widely used by organizations that have a scheduled release cycle.
Since the git-flow is a wrapper around Git, you can install git-flow in your current repository. It’s a straightforward process and it doesn’t change anything in your repository other than creating branches for you.
To install on a Mac machine, execute brew install git-flow in your terminal.
To install on a Windows machine, you’ll need to download and install the git-flow. After the installation is done, run git flow init to use it in your project.
1.1.5 Git Fork Workflow
The Fork workflow is popular among teams who use open-source software.
The flow usually looks like this:
- The developer forks the open-source software’s official repository. A copy of this repository is created in their account.
- The developer then clones the repository from their account to their local system.
- A remote path for the official repository is added to the repository that is cloned to the local system.
- The developer creates a new feature branch is created in their local system, makes changes, and commits them.
- These changes along with the branch are pushed to the developer’s copy of the repository on their account.
- A pull request from the branch is opened to the official repository.
- The official repository’s manager checks the changes and approves the changes to get merged into the official repository.
1.2 Git 基础和原理
1.2.1 直接记录快照,而非差异比较
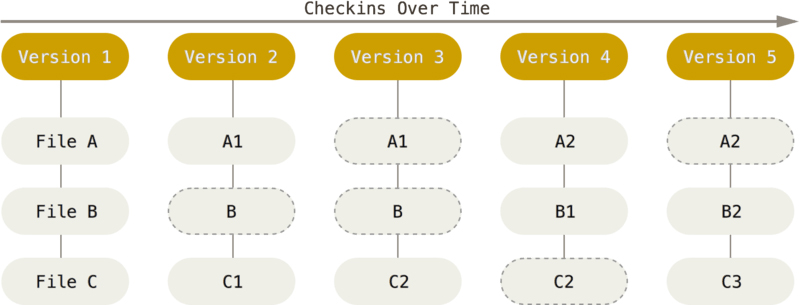
Git和其他版本控制系统(包括SVN和近似工具)的主要差别在于Git对待数据的方法。概念上来区分,其他大部分系统以文件变更列表的方式存储信息。这类系统(CVS、Subversion、Perforce、Bazaar等等)将它们保存的信息看作是一组基本文件和每个文件随时间逐步累积的差异。Git不按照以上方式对待或保存数据。反之,Git更像是把数据看作是对小型文件系统的一组快照。每次你提交更新,或在Git中保存项目状态时,它主要对当时的全部文件制作一个快照并保存这个快照的索引。为了高效,如果文件没有修改,Git不再重新存储该文件,而是只保留一个链接指向之前存储的文件。Git对待数据更像是一个快照流。如下图所示。这是Git与几乎所有其它版本控制系统的重要区别。
1.2.2 近乎所有操作都是本地执行
在Git中的绝大多数操作只需要访问本地文件和资源,一般不需要来自网络上其它计算机的信息。如果你习惯于所有操作都有网络延时开销的集中式版本控制系统,Git在这方面会让你感到速度之神赐给了Git超凡的能量。因为你在本地磁盘上就有项目的完整历史,所以大部分操作看起来瞬间完成。
举个例子,要浏览项目的历史,Git不需要外连到服务器去获取历史,然后再显示出来,它只需要直接从本地数据库中读取。你能立即看到项目历史。如果想查看当前版本与一个月前的版本之间引入的修改,Git会查找到一个月前的文件做一次本地的差异计算,而不是由远程服务器处理或从远程服务器拉回旧版本文件再来本地处理。
1.2.3 Git 保证完整性
Git中所有数据在存储前都计算校验和,然后以校验和来引用。这意味着不可能在Git不知情时更改任何文件内容或目录内容。这个功能构建在Git底层,是构成Git哲学不可或缺的部分。若你在传送过程中丢失信息或损坏文件,Git就能发现。
1.2.4 Git一般只添加数据
你执行的Git操作,几乎只往Git数据库中增加数据。很难让Git执行任何不可逆的操作,或者让它以任何形式清除数据。同别的VCS一样,未提交更新时有可能丢失或弄乱修改的内容,但是一旦你提交快照到Git中,就难以再丢失数据,特别是如果你定期的推送数据库到其它仓库的话。
1.3 Git 的工作流程
1.3.1 先来了解4个专有名词
Workspace(工作区):
我们平时进行开发改动的地方,是我们当前看到的,也是最新的。平常我们开发就是拷贝远程仓库中的一个分支,基于该分支进行开发,在开发过程中就是对工作区的操作。
Index / Stage(暂存区):
.git目录下的 index 文件,暂存区会记录git add添加文件的相关信息(文件名、大小、timestamp…),不保存文件实体,通过 id 指向每个文件实体。可以使用git status查看暂存区的状态。暂存区标记了你当前工作区中,哪些内容是被 git 管理的。当我们完成某个需求或功能后需要提交到远程仓库,那么第一步就是通过
git add命令先提交到暂存区,被 git 管理。Local Repository(本地仓库):
保存了对象被提交过的各个版本,比起工作区和暂存区的内容,它要更旧一些。
git commit后同步index(暂存区)的目录树到本地仓库,方便从下一步通过git push同步本地仓库与远程仓库。Remote Repository(远程仓库):
远程仓库是指托管在一些Git代码托管平台上的你的项目的版本库,比如GitHub、GitLab、码云、码市等等。远程仓库的内容可能被分布在多个地点的处于协作关系的本地仓库修改,因此它可能与本地仓库同步,也可能不同步,但是远程仓库的内容是最旧的。
四个区域之间的关系如下图所示:

1.4 常用的Git命令详解
1.4.1 HEAD
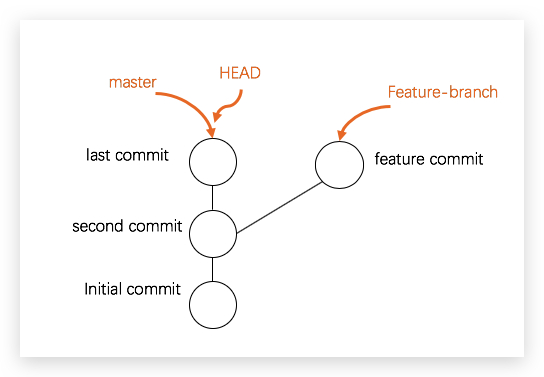
HEAD,它始终指向当前所处分支的最新的提交点,所处的分支发生了变化,或者产生了新的提交点,HEAD就会跟着改变。
1.4.2 git add
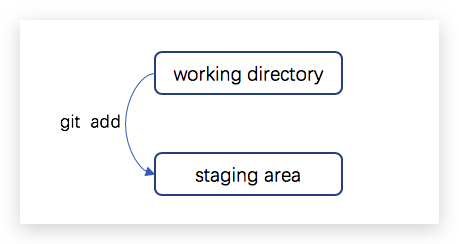
git add 主要实现将工作区修改的内容提交到暂存区,交由git管理。
1 | 添加当前目录的所有文件到暂存区 |
1.4.3 git commit
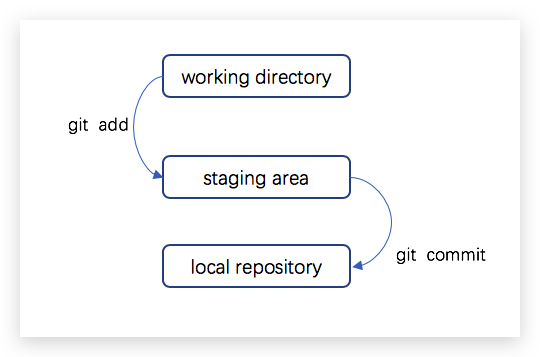
git commit 主要实现将暂存区的内容提交到本地仓库,并使得当前分支的HEAD向后移动一个提交点。相关命令如下表所示:
1 | 提交暂存区到本地仓库,message代表说明信息 |
1.4.4 git branch
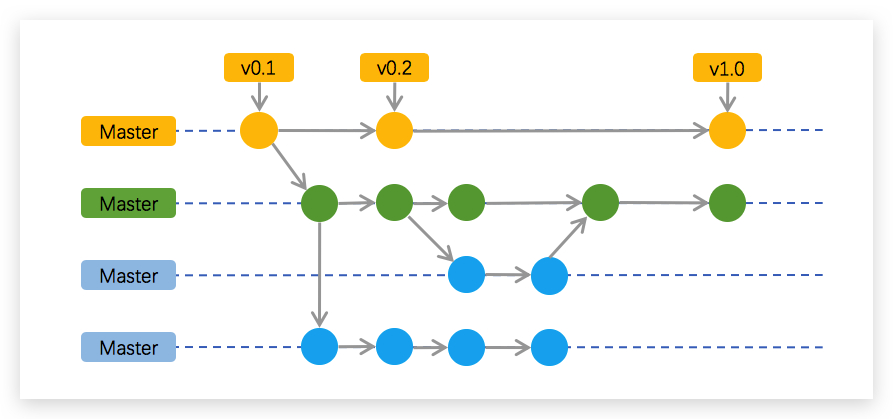
在我们的代码仓库中,有一条主分支Master,我们可以从主分支当中,创建出许多分支以开发其他功能,创建子分支的好处是每个分支互不影响,大家只需要在自己的分支上继续开发,正常工作。待开发完毕后,再将自己的子分支合并到主分支或者其他分支即可,这样,即安全又不影响他人的工作。
关于分支,主要有展示分支、切换分支、创建分支、删除分支操作。相关命令如下表所示:
1 | 列出本地所有分支 |
1.4.5 git merge
git merge 命令的作用是把不同的分支合并起来。在实际的开发中,我们会从master主分支中创建出一个新的分支,然后进行需求或功能的开发,最后开发完成后需要合并子分支到主分支master中,这就需要用到git merge命令。
1 | 合并指定分支到当前分支 |

1.4.6 git rebase
rebase又称为衍合,是合并的另外一种选择。在开始阶段,我们在新的分支上,执行 git rebase dev,那么新分支上的commit都在master分支上重演一遍,最后checkout切换回到新的分支。这一点与merge命令是一样的,合并前后所处的分支并没有改变。

1.4.7 git reset
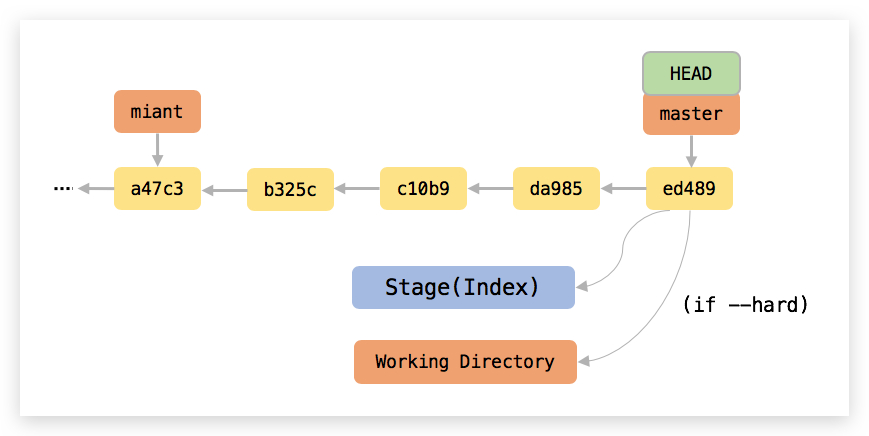
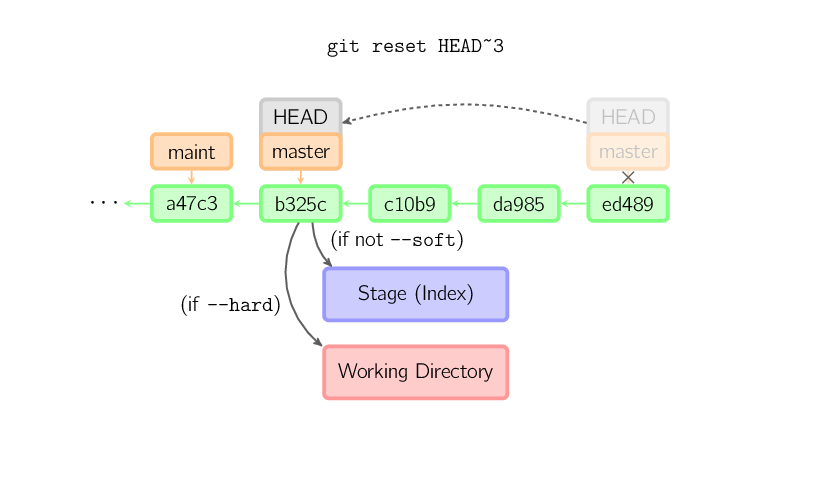
git reset 命令把当前分支指向另一个位置,并且有选择的变动工作目录和索引。也用来从历史仓库中复制文件到索引,而不动工作目录。如果不给选项,那么当前分支指向到那个提交。如果用 –-hard 参数,那么工作目录也更新,如果用 –-soft 参数,那么都不变。使用 git reset HEAD ~3 命令的说明如下图所示:
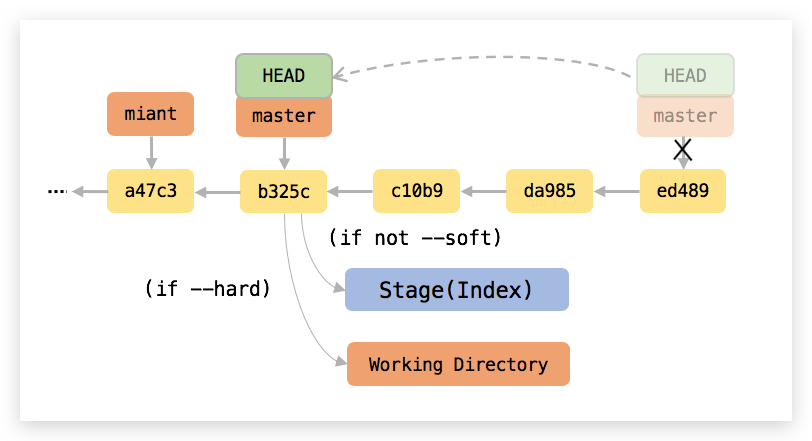
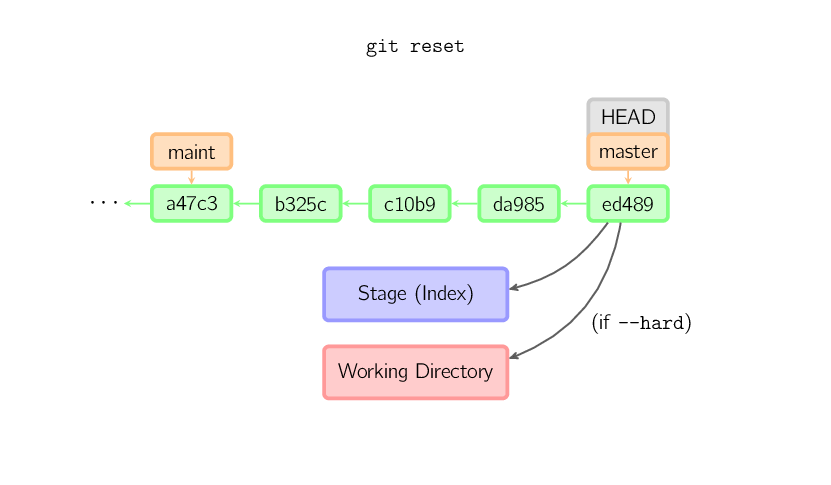
如果没有给出提交的版本号,那么默认用HEAD。这样,分支指向不变,但是索引会回滚到最后一次提交,如果用 –-hard 参数,工作目录也一样。
1 | 只改变提交点,暂存区和工作目录的内容都不改变 |
1.4.8 git revert
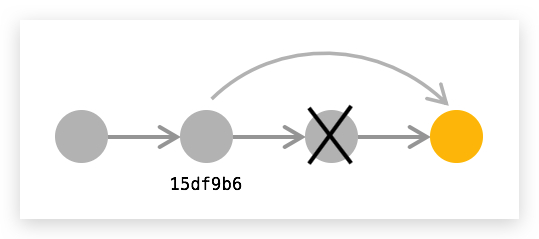
revert 是用一个新的提交来消除一个历史提交所做的任何修改,revert之后,我们本地的代码会回滚到指定的历史版本。举个例子,其结果如下图所示:
1 | git commit -am 'update readme' |
1.4.9 git push
将本地仓库分支上传到远程仓库分支,实现同步。相关命令如下:
1 | 上传本地指定分支到远程仓库 |
1.4.10 git fetch
git fetch 是从远程仓库中获取最新版本到本地仓库中,但不会自动合并本地的版本,也就说,我们可以查看更新情况,然后再决定是否进行合并。在fetch命令中,有一个重要的概念:FETCH_HEAD:某个branch在服务器上的最新状态,每一个执行过fetch操作,都会存在一个FETCH_HEAD列表,这个列表保存在 .git 目录的FETCH_HEAD文件中,其中每一行对应于远程服务器的每一个分支。当前分支指向的FETCH_HEAD,就是文件第一行对应的那个分支。
1.4.11 git pull
git pull 是从远程仓库中获取最新版本并自动合并到本地的仓库。
1 | git pull origin next |
上面命令表示,取回 origin/next 分支的更新,再与当前分支进行合并。实质上,等同于,先做 git fetch,再执行 git merge。
1 | git fetch origin |
1.5 一些命令的区别
1.5.1 merge 和 rebase
举个例子说明:现在我们有这样两个分支,test 和 master,其提交记录如下图所示:
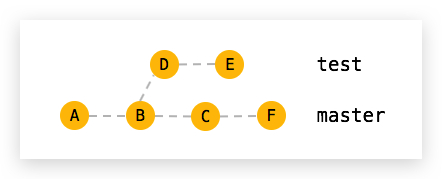
在 master 分支上执行 git merge test 命令后,会得到如下图所示的结果:

如果在master分支上执行 git rebase test 命令,则会得到如下图所示的结果:

由上面的例子可以看出,merge操作会生成一个新的节点,之前的提交分开显示。而rebase操作不会生成新的节点,是将两个分支融合成一个线性的提交记录。
如果我们想要一个干净的,没有merge commit的线性历史树,那么应该选择git rebase,如果想保留完整的历史记录,并且想要避免重写commit history的风险,应该选择使用git merge。
1.5.2 reset 和 revert
- revert 是用一次新的commit来回滚之前的commit,而 reset 是直接删除指定的commit。
- 在回滚这一操作上看,效果差不多。但在日后继续merge以前的老版本时有区别。因为
git revert是用一次逆向的commit“中和”之前的提交,因此日后合并老的分支时,导致这部分改变不会再次出现,减少冲突。但是git reset是直接把某个 commit 在某个分支上删除,因而和老的分支再次 merge 时,这些被回滚的commit应该还会被引入,产生很多冲突。 git reset是把HEAD向后移动了一下,而git revert是HEAD继续前进,只是新的commit的内容和要revert的内容正好相反,能够抵消要被revert的内容。
1.5.3 fetch 和 pull
git fetch 和 git pull 共同点都是从远程的分支获取最新的版本到本地,但fetch命令不会自动将更新合并到本地的分支,而pull命令会自动合并到本地的分支。在实际的使用中,git fetch 要更安全一些,因为获取到最新的更新后,我们可以查看更新情况,然后再决定是否合并。
2. 图解Git[强烈推荐]
2.1 基本用法
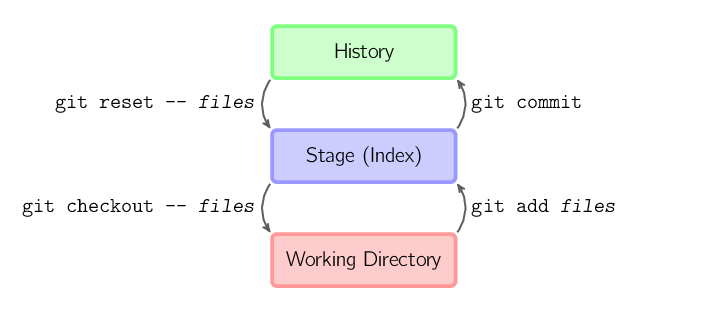
上面的四条命令在工作目录、暂存目录(也叫做索引)和仓库之间复制文件。
git add files把当前文件放入暂存区域。git commit给暂存区域生成快照并提交。git reset -- files用来撤销最后一次git add files,你也可以用git reset撤销所有暂存区域文件。git checkout -- files把文件从暂存区域复制到工作目录,用来丢弃本地修改。
你可以用 git reset -p, git checkout -p, git add -p 进入交互模式。
也可以跳过暂存区域直接从仓库取出文件或者直接提交代码。
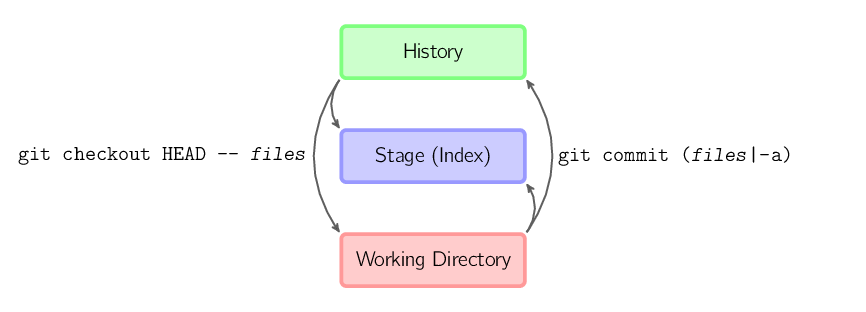
git commit -a相当于运行git add把所有当前目录下的文件加入暂存区域再运行git commit.git commit files进行一次包含最后一次提交加上工作目录中文件快照的提交。并且文件被添加到暂存区域。git checkout HEAD -- files回滚到复制最后一次提交。
2.2 约定
后文中以下面的形式使用图片。
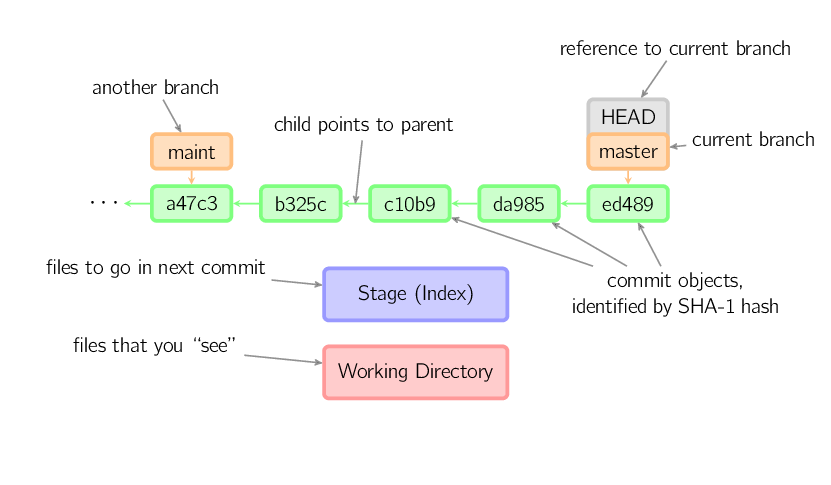
绿色的 5 位字符表示提交的 ID,分别指向父节点。分支用橘色显示,分别指向特定的提交。当前分支由附在其上的 HEAD 标识。 这张图片里显示最后 5 次提交,ed489 是最新提交。 master 分支指向此次提交,另一个maint 分支指向祖父提交节点。
2.3 命令详解
2.3.1 Diff
有许多种方法查看两次提交之间的变动。下面是一些示例。
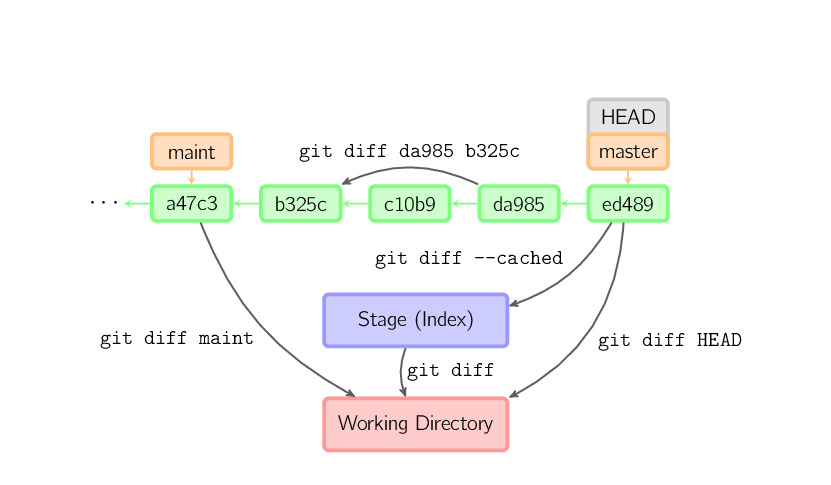
2.3.2 Commit
提交时,git 用暂存区域的文件创建一个新的提交,并把此时的节点设为父节点。然后把当前分支指向新的提交节点。下图中,当前分支是 master。 在运行命令之前,master 指向 ed489,提交后,master 指向新的节点 f0cec 并以 ed489 作为父节点。
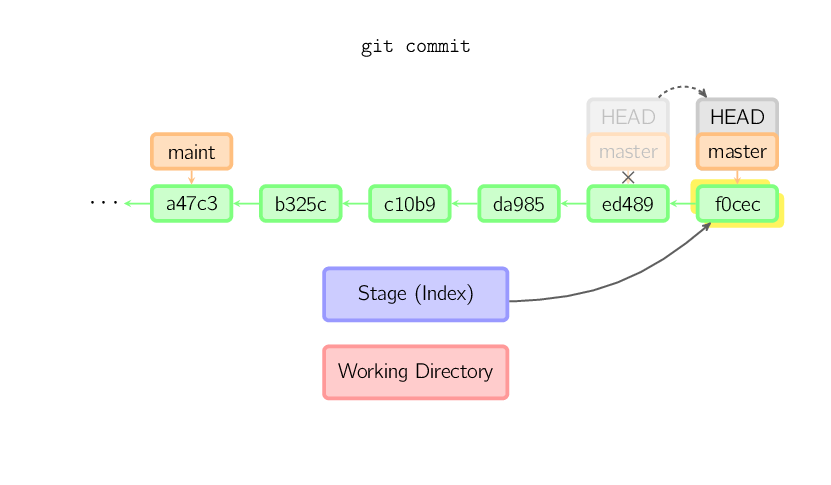
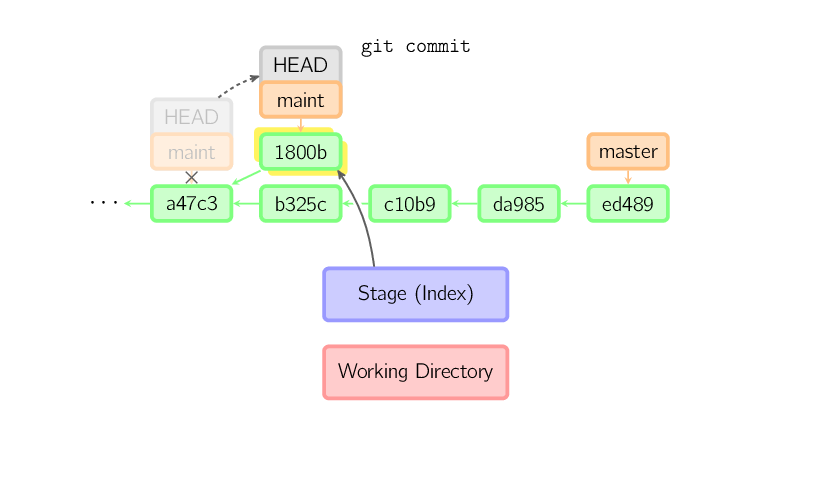
即便当前分支是某次提交的祖父节点,git 会同样操作。下图中,在 master 分支的祖父节点 maint 分支进行一次提交,生成了 1800b。 这样,maint 分支就不再是 master 分支的祖父节点。此时,合并 (或者 衍合) 是必须的。
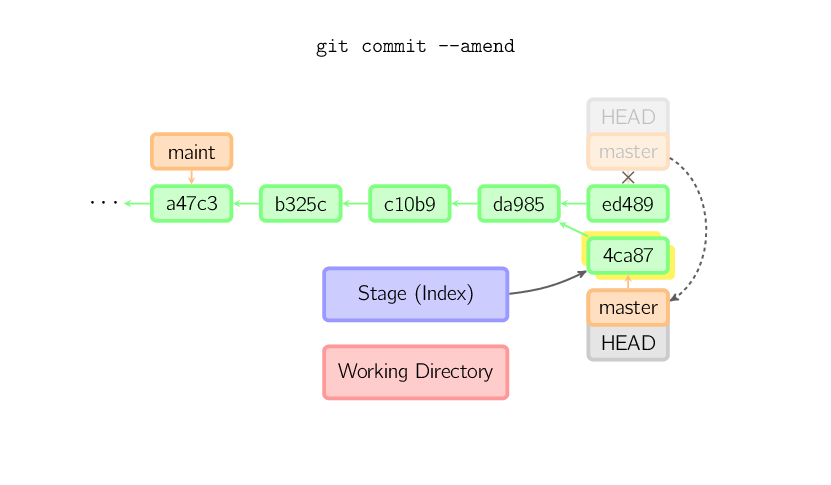
如果想更改一次提交,使用 git commit --amend。git 会使用与当前提交相同的父节点进行一次新提交,旧的提交会被取消。
另一个例子是 分离HEAD提交, 后文讲。
2.3.3 Checkout
checkout 命令通常用来从仓库中取出文件,或者在分支中切换。
checkout 命令让 git 把文件复制到工作目录和暂存区域。比如 git checkout HEAD~ foo.c 把文件从 foo.c 提交节点 HEAD~ (当前提交节点的父节点)复制到工作目录并且生成索引。注意当前分支没有变化。
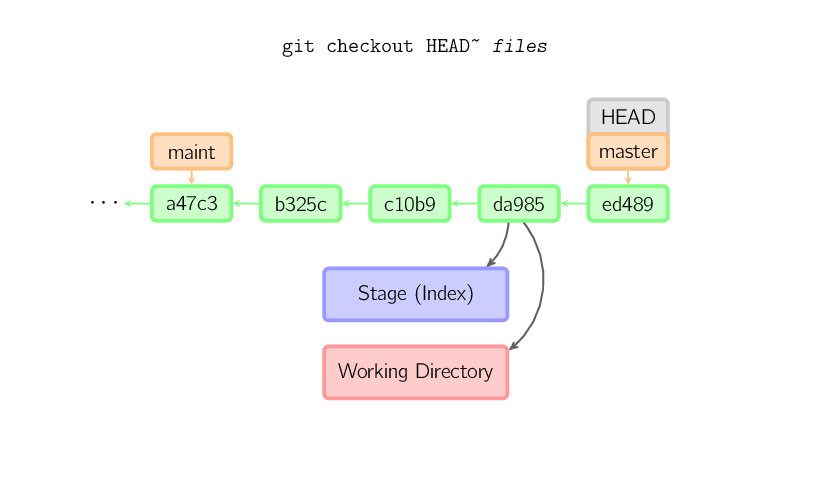
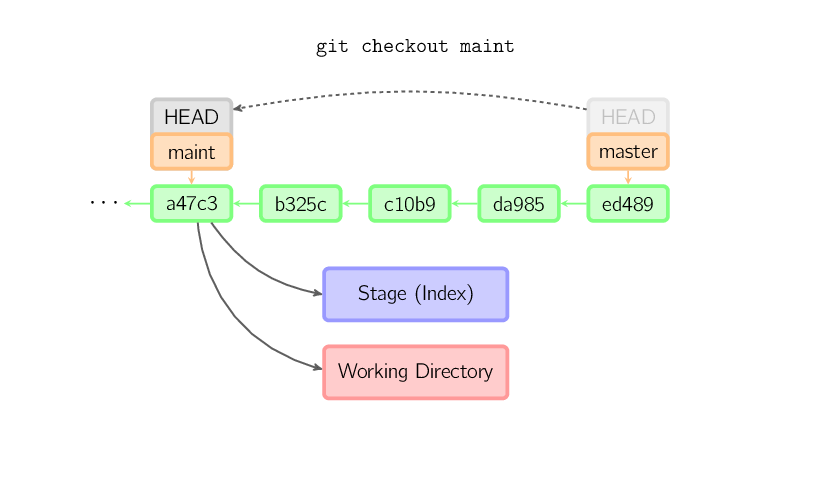
如果没有指定文件名,而是一个本地分支,那么将切换到那个分支去。同时把索引和工作目录切换到那个分支对应的状态。
如果既没有指定文件名,也没有指定分支名,而是一个标签、远程分支、SHA-1 值或者是像 master~3 类似的东西,就得到一个匿名分支,称作 detached HEAD。 这样可以很方便的在历史版本之间互相切换。但是,这样的提交是完全不同的,详细的在下面。
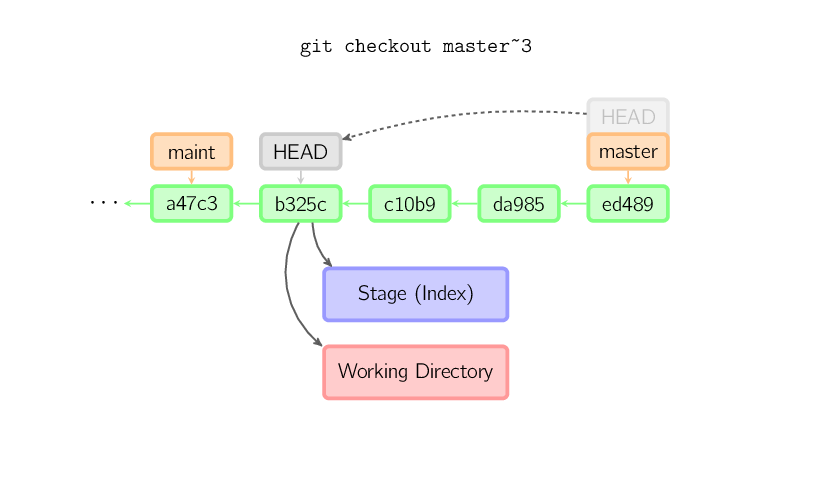
2.3.4 用分离HEAD提交(找不到好的译法)
HEAD 是分离的时候, 提交可以正常进行, 但是没有更新已命名的分支 。(可以看作是匿名分支。)
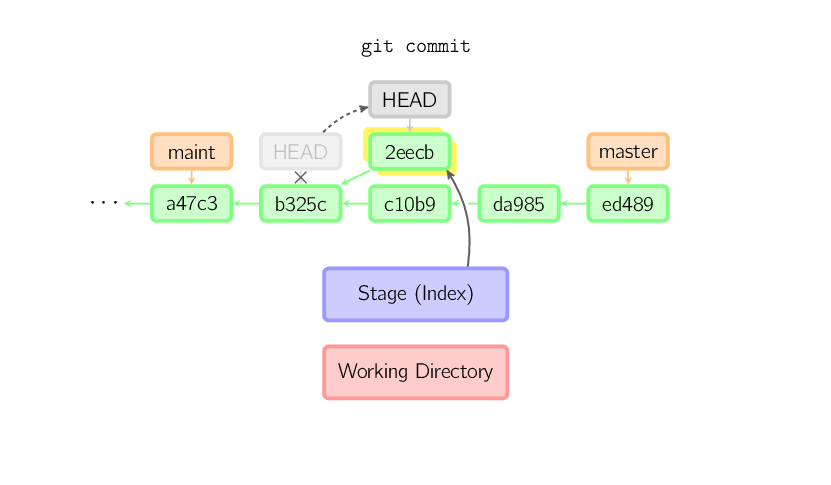
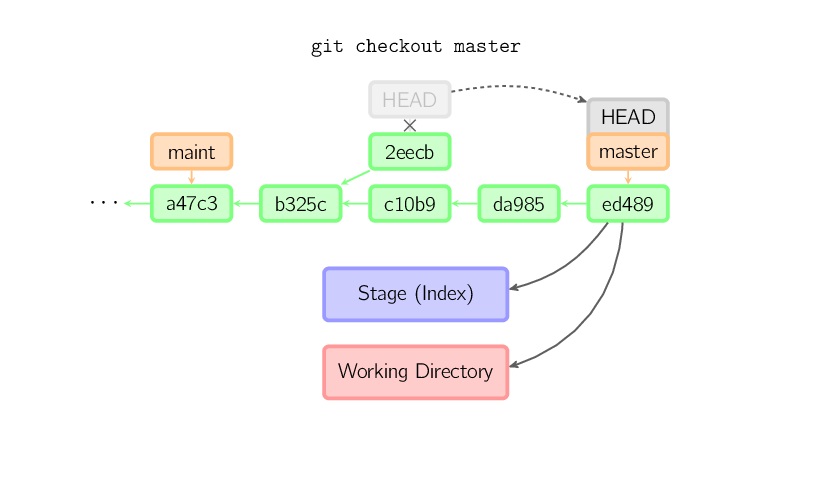
如果此时切换到别的分支,那么所作的工作会全部丢失。注意这个命令之后就不存在 2eecb 了。
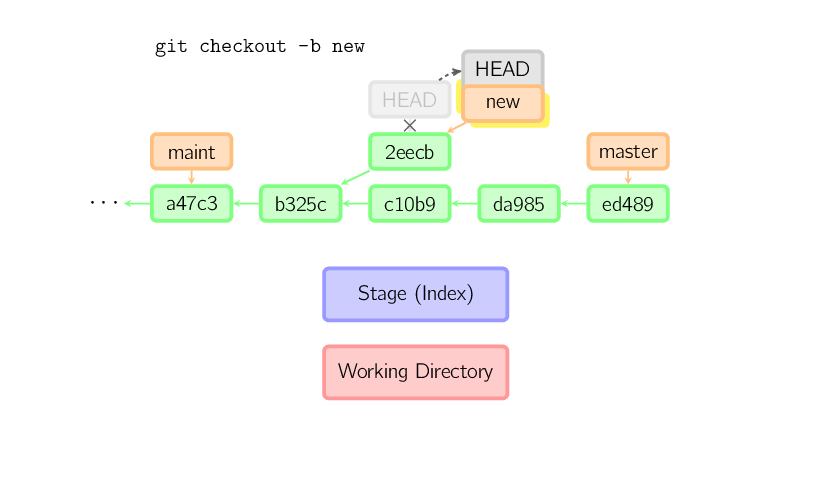
如果你想保存当前的状态,可以用这个命令创建一个新的分支: git checkout -b name。
2.3.5 Reset
reset 命令把当前分支指向另一个位置,并且有选择的变动工作目录和索引。也用来在从历史仓库中复制文件到索引,而不动工作目录。
如果不给选项,那么当前分支指向到那个提交。如果用 --hard 选项,那么工作目录也更新,如果用 --soft 选项,那么都不变。
如果没有给出提交点的版本号,那么默认用 HEAD。这样,分支指向不变,但是索引会回滚到最后一次提交,如果用 --hard 选项,工作目录也同样。
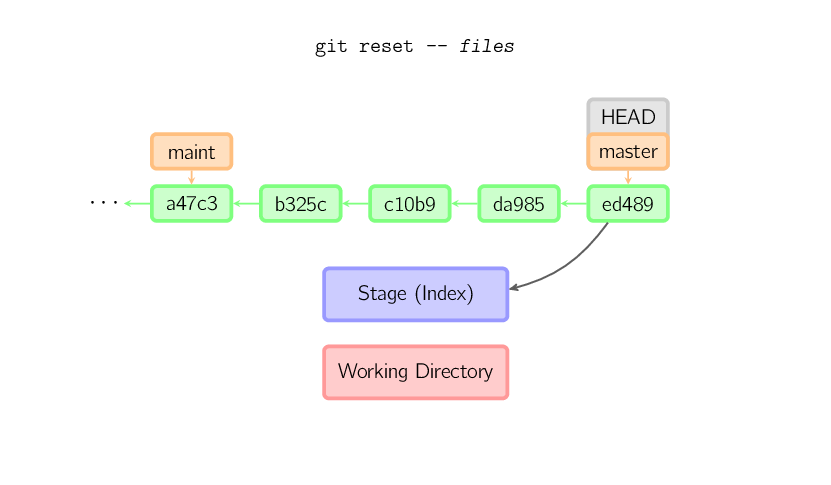
如果给了文件名(或者 -p 选项), 那么工作效果和带文件名的checkout差不多,除了索引被更新。
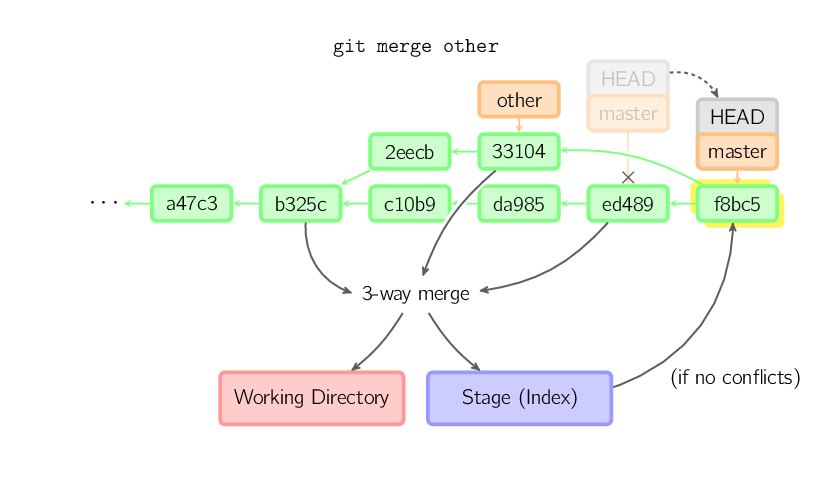
2.3.6 Merge
merge 命令把不同分支合并起来。合并前,索引必须和当前提交相同。如果另一个分支是当前提交的祖父节点,那么合并命令将什么也不做。 另一种情况是如果当前提交是另一个分支的祖父节点,就导致 fast-forward 合并。指向只是简单的移动,并生成一个新的提交。
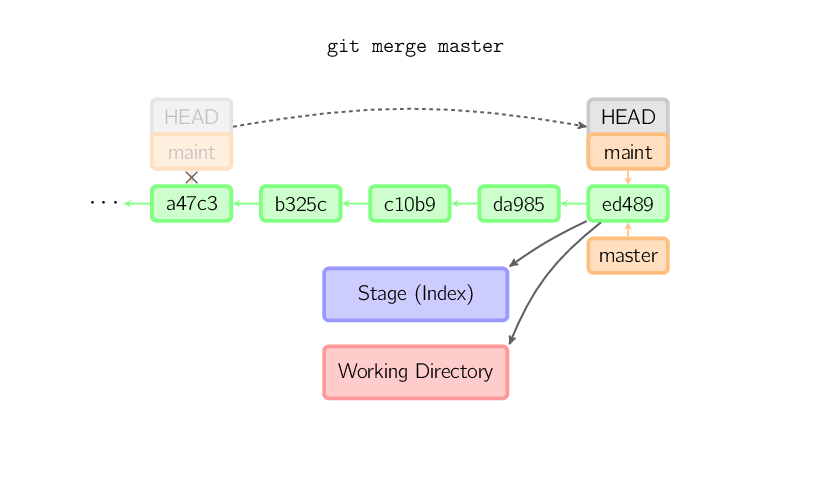
否则就是一次真正的合并。默认把当前提交( ed489 如下所示) 和另一个提交( 33104 )以及他们的共同祖父节点( b325c ) 进行一次三方合并。结果是先保存当前目录和索引,然后和父节点 33104 一起做一次新提交。
2.3.7 Cherry Pick
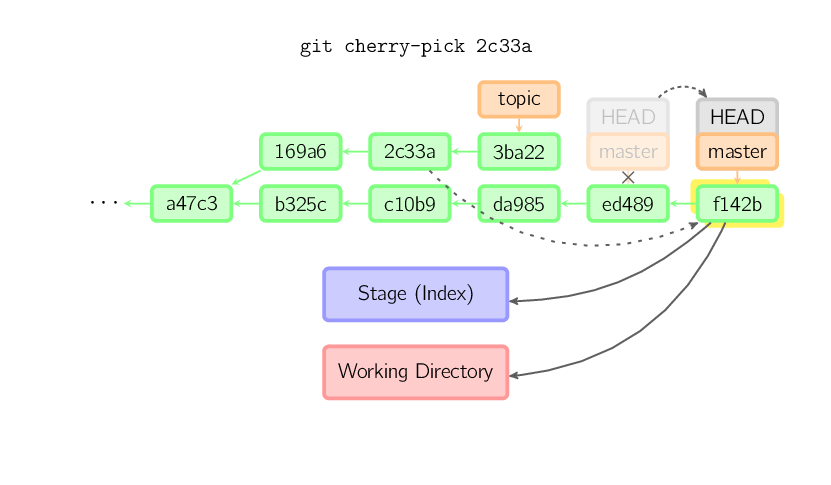
cherry-pick 命令”复制”一个提交节点并在当前复制做一次完全一样的新提交。
2.3.8 Rebase
衍合是合并命令的另一种选择。合并把两个父分支合并进行一次提交,提交历史不是线性的。衍合在当前分支上重演另一个分支的历史,提交历史是线性的。 本质上,这是线性化的自动的 cherry-pick
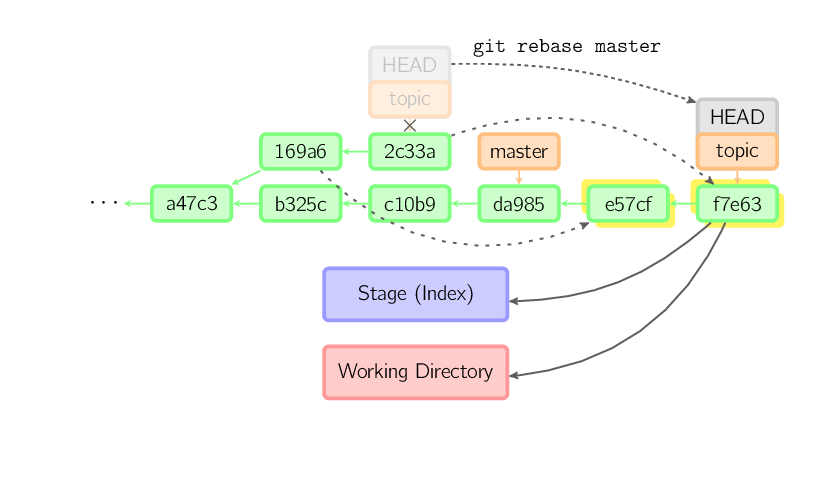
上面的命令都在 topic 分支中进行,而不是 master 分支,在 master 分支上重演,并且把分支指向新的节点。注意旧提交没有被引用,将被回收。
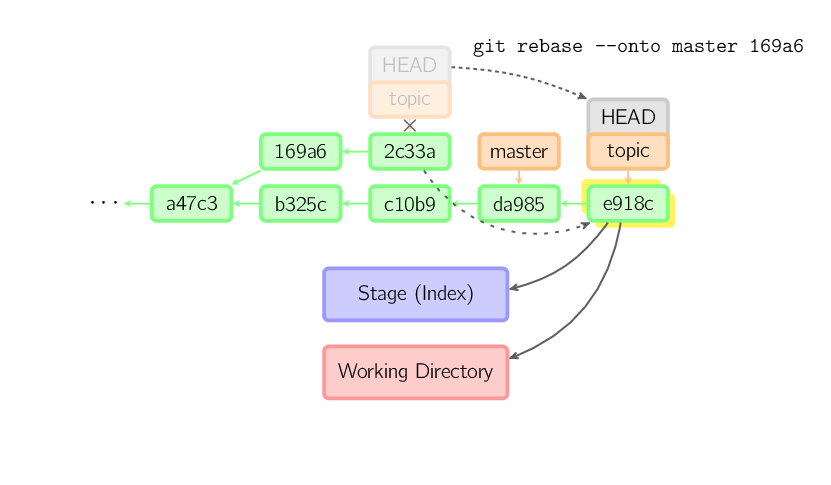
要限制回滚范围,使用 --onto 选项。下面的命令在 master 分支上重演当前分支从 169a6 以来的最近几个提交,即 2c33a。
同样有 git rebase --interactive 让你更方便的完成一些复杂操组,比如丢弃、重排、修改、合并提交。没有图片体现着下,细节看这里: git-rebase(1)
3. 图解Git原理与日常实用指南
3.1 Feature Branching:最流行的工作流
核心:
- 任何新的功能(feature)或 bug 修复全都新建一个 branch 来写;
- branch 写完后,合并到 master,然后删掉这个 branch(可使用
git origin -d 分支名删除远程仓库的分支)。
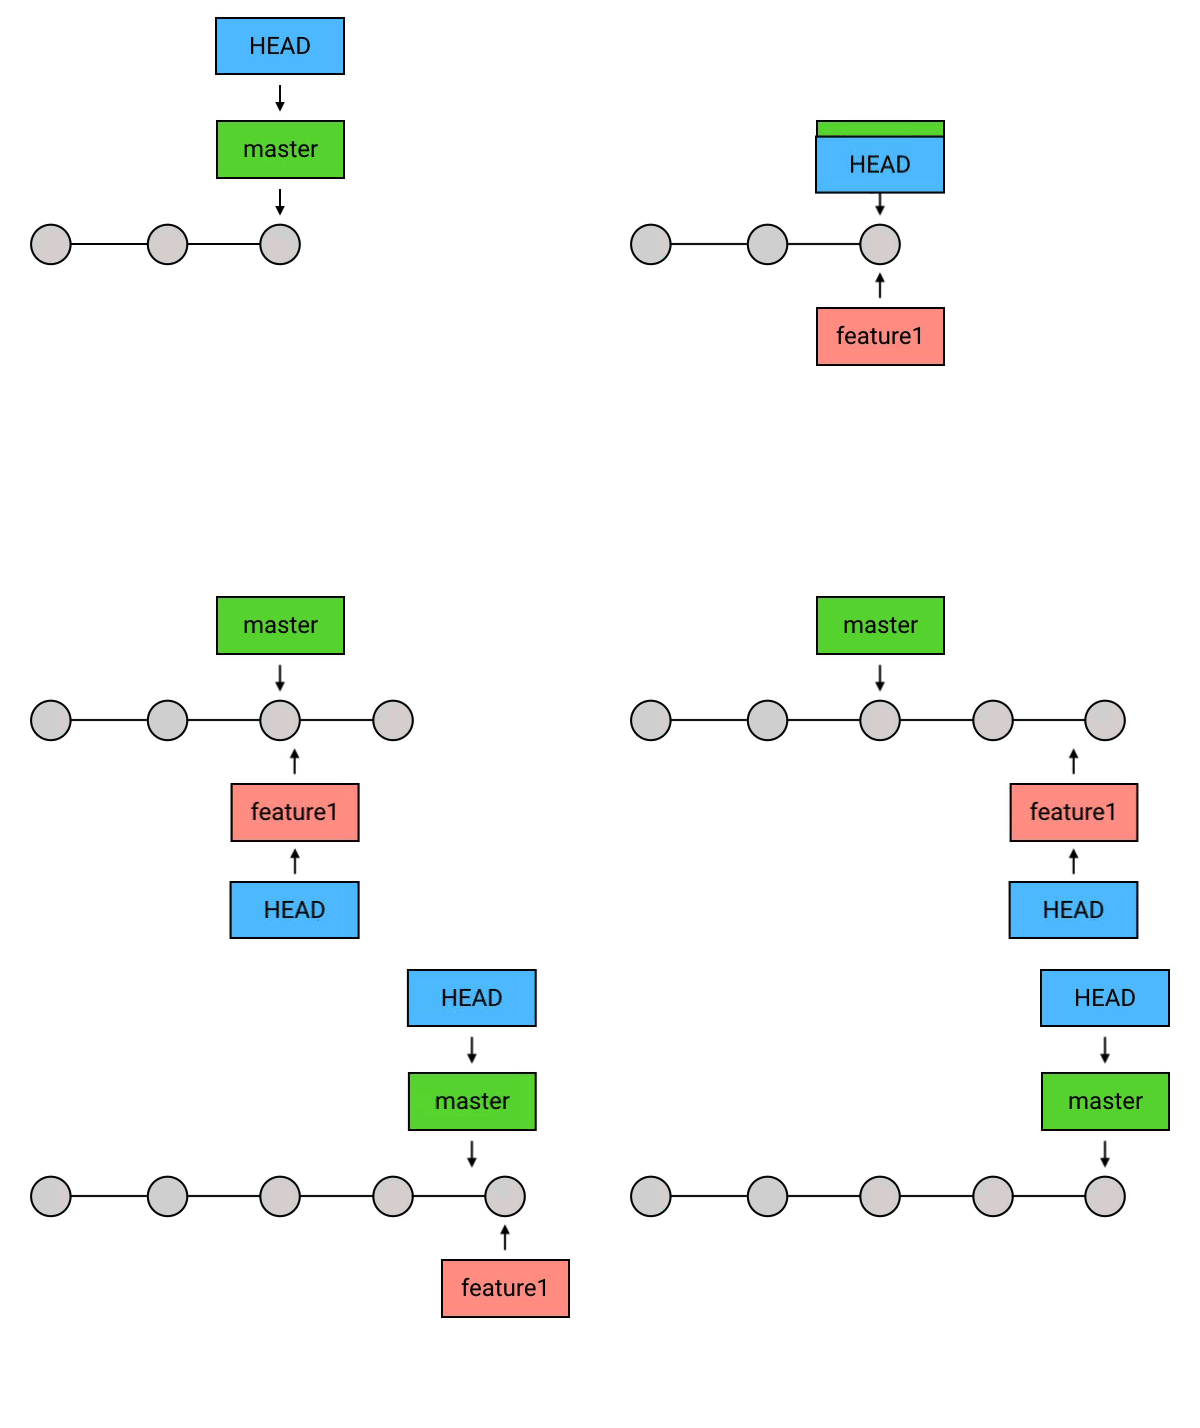
优势:
- 代码分享:写完之后可以在开发分支 review 之后再 merge 到 master 分支
- 一人多任务:当正在开发接到更重要的新任务时,你只要稍微把目前未提交的代码简单收尾一下,然后做一个带有「未完成」标记的提交(例如,在提交信息里标上「TODO」),然后回到 master 去创建一个新的 branch 进行开发就好了。
3.2 HEAD、branch、引用的本质以及 push 的本质
3.2.1 HEAD:当前commit的引用
当前 commit 在哪里,HEAD 就在哪里,这是一个永远自动指向当前 commit 的引用,所以你永远可以用 HEAD 来操作当前 commit,
3.2.2 branch:
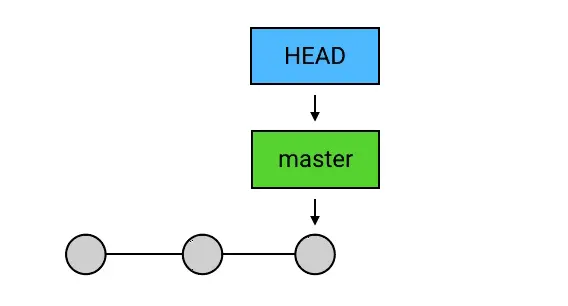
HEAD 是 Git 中一个独特的引用,它是唯一的。而除了 HEAD 之外,Git 还有一种引用,叫做 branch(分支)。HEAD 除了可以指向 commit,还可以指向一个 branch,当指向一个 branch 时,HEAD 会通过branch 间接指向当前 commit,HEAD 移动会带着 branch 一起移动:
branch 包含了从初始 commit 到它的所有路径,而不是一条路径。并且,这些路径之间也是彼此平等的。
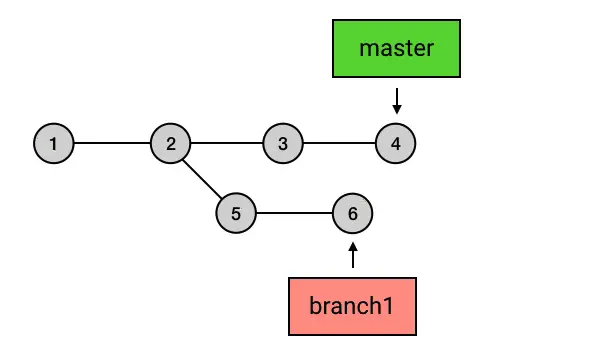
像上图这样,master 在合并了 branch1 之后,从初始 commit 到 master 有了两条路径。这时,master 的串就包含了 1 2 3 4 7 和 1 2 5 6 7 这两条路径。而且,这两条路径是平等的,1 2 3 4 7 这条路径并不会因为它是「原生路径」而拥有任何的特别之处
创建branch:
1 | git branch 名称 |
切换branch:
1 | git checkout 名称 # 将 HEAD指向该 branch |
创建 + 切换:
1 | git checkout -b 名称 |
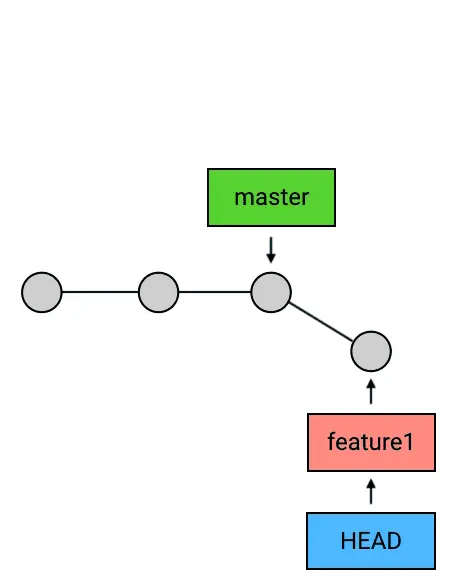
在切换到新的 branch 后,再次 commit 时 HEAD 就会带着新的 branch 移动了:
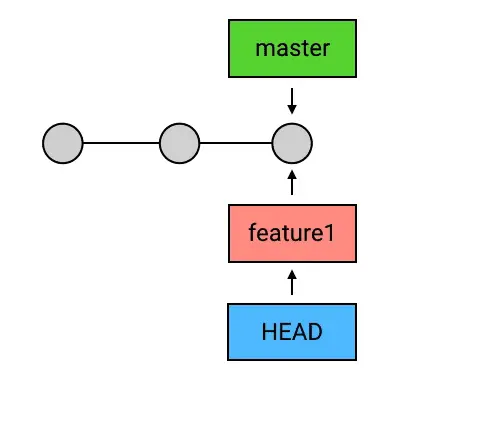
而这个时候,如果你再切换到 master 去 commit,就会真正地出现分叉了:
删除branch:git branch -d 名称
注意:
- HEAD 指向的 branch 不能删除。如果要删除 HEAD 指向的 branch,需要先用
checkout把 HEAD 指向其他地方。 - 由于 Git 中的 branch 只是一个引用,所以删除 branch 的操作也只会删掉这个引用,并不会删除任何的
commit。(不过如果一个commit不在任何一个 branch 的「路径」上,或者换句话说,如果没有任何一个 branch 可以回溯到这条commit(也许可以称为野生commit?),那么在一定时间后,它会被 Git 的回收机制删除掉) - 出于安全考虑,没有被合并到 master 过的 branch 在删除时会失败(怕误删未完成branch)把
-d换成-D可以强制删除
3.2.3 引用的本质
所谓引用,其实就是一个个的字符串。这个字符串可以是一个 commit 的 SHA-1 码(例:c08de9a4d8771144cd23986f9f76c4ed729e69b0),也可以是一个 branch(例:ref: refs/heads/feature3)。
Git 中的 HEAD 和每一个 branch 以及其他的引用,都是以文本文件的形式存储在本地仓库 .git 目录中,而 Git 在工作的时候,就是通过这些文本文件的内容来判断这些所谓的「引用」是指向谁的。
3.2.4 push的本质:把 branch 上传到远程仓库
- 把当前 branch 位置上传到远程仓库,并把它路径上的
commits一并上传 - git 中(2.0及以后版本),
git push不加参数只能上传到从远程仓库clone或者pull下来的分支,如需push在本地创建的分支则需使用git push origin 分支名的命令 - 远端仓库的 HEAD 并不随
push与本地一致,远端仓库 HEAD 永远指向默认分支(master),并随之移动(可以使用git br -r查看远程分支的 HEAD 指向)。
3.3 开启git操作之旅
3.3.1 merge:合并
含义:从目标 commit 和当前 commit (即 HEAD 所指向的 commit)分叉的位置起,把目标 commit 的路径上的所有 commit 的内容一并应用到当前 commit,然后自动生成一个新的 commit。
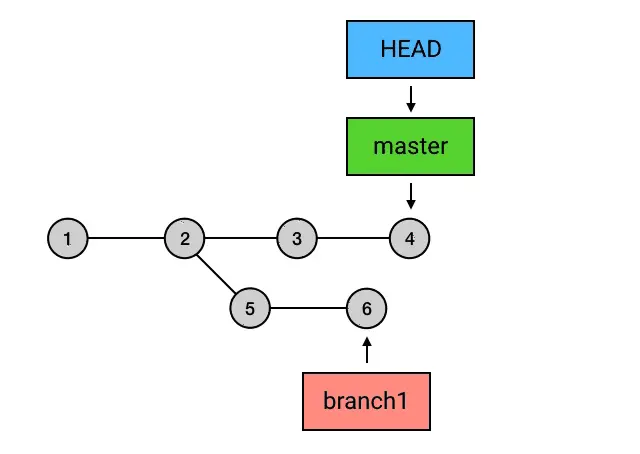
当执行 git merge branch1 操作,Git 会把 5 和 6 这两个 commit 的内容一并应用到 4 上,然后生成一个新的提交 7 。
merge 的特殊情况:
merge冲突:你的两个分支改了相同的内容,Git 不知道应该以哪个为准。如果在merge的时候发生了这种情况,Git 就会把问题交给你来决定。具体地,它会告诉你merge失败,以及失败的原因;这时候你只需要手动解决掉冲突并重新 add、commit(改动不同文件或同一文件的不同行都不会产生冲突);或者使用git merge --abort放弃解决冲突,取消merge- HEAD 领先于目标
commit:merge是一个空操作:
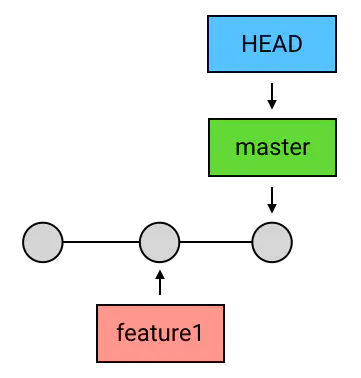
此时 merge 不会有任何反应。
- HEAD 落后于 目标
commit且不存在分支(fast-forward):
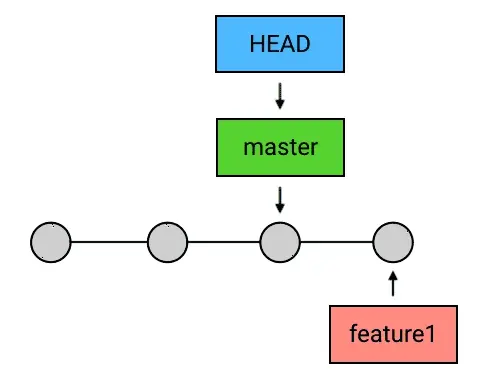
git 会直接把 HEAD 与其指向的 branch(如果有的话)一起移动到目标 commit。
3.3.2 rebase:给commit序列重新设置基础点
有些人不喜欢 merge,因为在 merge 之后,commit 历史就会出现分叉,这种分叉再汇合的结构会让有些人觉得混乱而难以管理。如果你不希望 commit 历史出现分叉,可以用 rebase 来代替 merge。
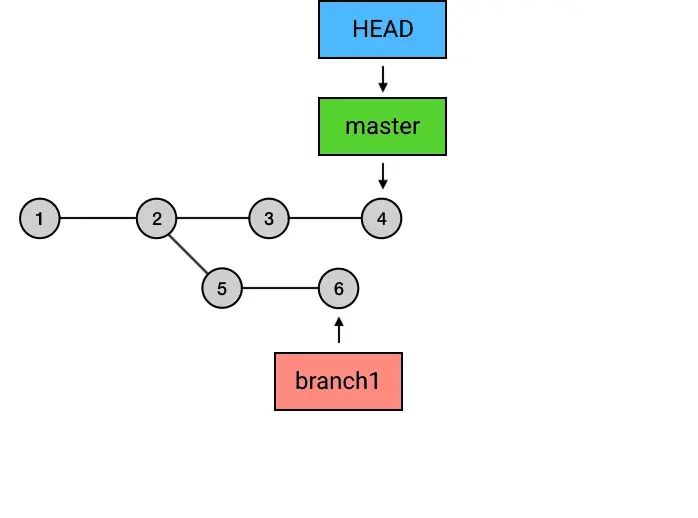
可以看出,通过 rebase,5 和 6 两条 commits 把基础点从 2 换成了 4 。通过这样的方式,就让本来分叉了的提交历史重新回到了一条线。这种「重新设置基础点」的操作,就是 rebase 的含义。另外,在 rebase 之后,记得切回 master 再 merge 一下,把 master 移到最新的 commit。
为什么要从 branch1 来
rebase,然后再切回 master 再merge一下这么麻烦,而不是直接在 master 上执行rebase?从图中可以看出,
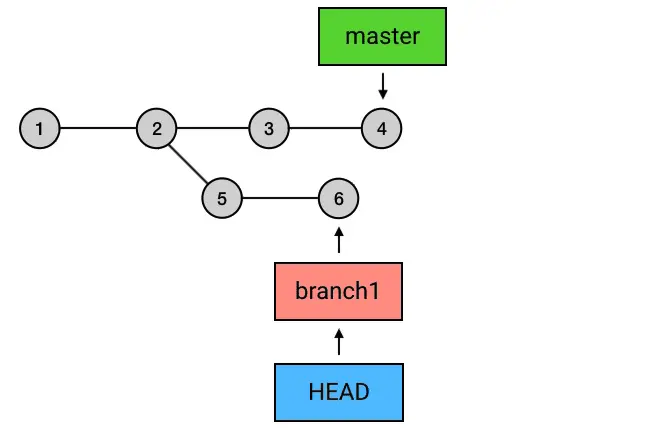
rebase后的每个commit虽然内容和rebase之前相同,但它们已经是不同的commit了(每个commit有唯一标志)。如果直接从 master 执行rebase的话,就会是下面这样:![GitGraph-9]()
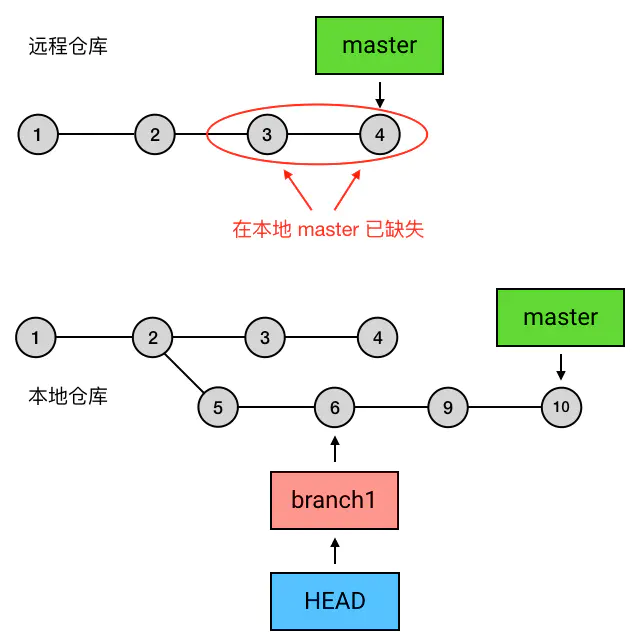
这就导致 master 上之前的两个最新
commit(3和4)被剔除了。如果这两个commit之前已经在远程仓库存在,这就会导致没法push:![GitGraph-10]()
所以,为了避免和远程仓库发生冲突,一般不要从 master 向其他 branch 执行
rebase操作。而如果是 master 以外的 branch 之间的rebase(比如 branch1 和 branch2 之间),就不必这么多费一步,直接rebase就好。
需要说明的是, rebase 是站在需要被 rebase 的 commit 上进行操作,这点和 merge 是不同的。
3.3.3 stash:临时存放工作目录的改动
stash 指令可以帮你把工作目录的内容全部放在你本地的一个独立的地方,它不会被提交,也不会被删除,你把东西放起来之后就可以去做你的临时工作了,做完以后再来取走,就可以继续之前手头的事了。
操作步骤:
git stash可以加上save参数后面带备注信息(git stash save '备注信息')- 此时工作目录已经清空,可以切换到其他分支干其他事情了
git stash pop弹出第一个stash(该 stash 从历史 stash 中移除);或者使用git stash apply达到相同的效果(该 stash 仍存在 stash list 中),同时可以使用git stash list查看 stash 历史记录并在 apply 后面加上指定的 stash 返回到该 stash。
注意:没有被 track 的文件会被 git 忽略而不被 stash,如果想一起 stash,加上 -u 参数。
3.3.4 reflog:引用记录的log
可以查看 git 的引用记录,不指定参数,默认显示 HEAD 的引用记录;如果不小心把分支删掉了,可以使用该命令查看引用记录,然后使用 checkout 切到该记录处重建分支即可。
注意:不再被引用直接或间接指向的 commits 会在一定时间后被 Git 回收,所以使用 reflog 来找回被删除的 branch 的操作一定要及时,不然有可能会由于 commit 被回收而再也找不回来。
3.3.5 看看我都改了什么
log:查看已提交内容
1 | git log -p # 可以查看每个 commit 的改动细节(到改动文件的每一行) |
diff:查看未提交内容
1 | git diff --staged |
3.3.6 刚刚提交的代码发现写错了怎么办?
再提一个修复了错误的 commit?可以是可以,不过还有一个更加优雅和简单的解决方法:commit --amend。
具体做法:
- 修改好问题
- 将修改 add 到暂存区
- 使用
git commit --amend提交修改,结果如下图:
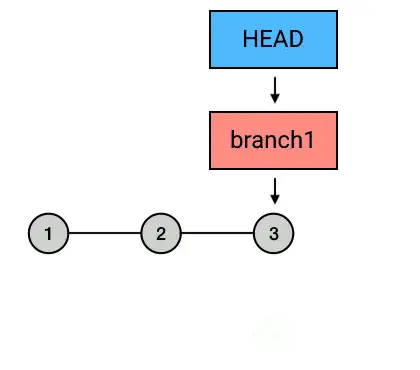
减少了一次无谓的 commit。
3.3.7 错误不是最新的提交而是倒数第二个?
使用 rebase -i(交互式 rebase):
所谓「交互式 rebase」,就是在 rebase 的操作执行之前,你可以指定要 rebase 的 commit 链中的每一个 commit 是否需要进一步修改,那么你就可以利用这个特点,进行一次「原地 rebase」。
操作过程:
git rebase -i HEAD^^
说明:在 Git 中,有两个「偏移符号」:
^和~。
^的用法:在commit的后面加一个或多个^号,可以把commit往回偏移,偏移的数量是^的数量。例如:master^ 表示 master 指向的commit之前的那个commit; HEAD^^ 表示 HEAD 所指向的commit往前数两个commit。
~的用法:在commit的后面加上~号和一个数,可以把commit往回偏移,偏移的数量是~号后面的数。例如:HEAD~5 表示 HEAD 指向的commit往前数 5 个commit。
上面这行代码表示,把当前 commit ( HEAD 所指向的 commit) rebase 到 HEAD 之前 2 个的 commit 上:
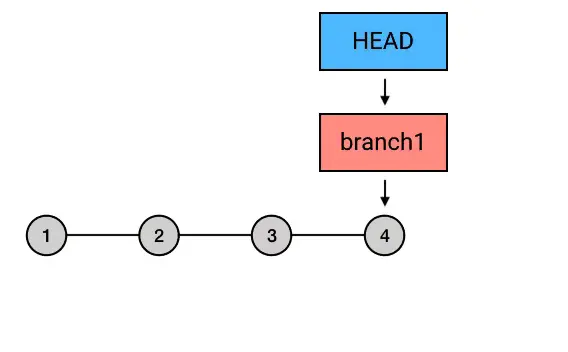
- 进入编辑页面,选择
commit对应的操作,commit为正序排列,旧的在上,新的在下,前面黄色的为如何操作该commit,默认pick(直接应用该commit不做任何改变),修改第一个commit为edit(应用这个commit,然后停下来等待继续修正)然后:wq退出编辑页面,此时rebase停在第二个commit的位置,此时可以对内容进行修改:
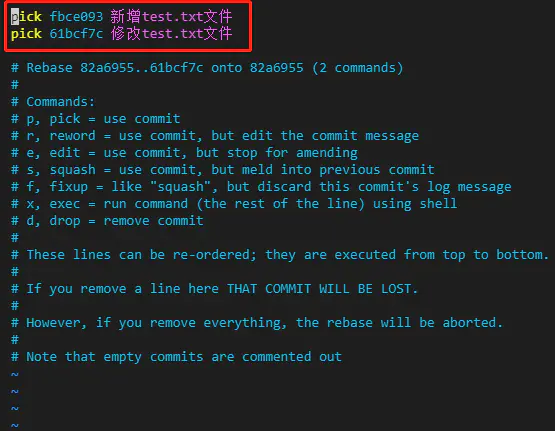
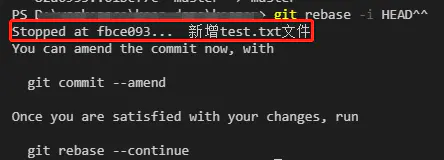
- 修改完后使用 add,
commit --amend将修改提交 git rebase --continue继续rebase过程,把后面的commit直接应用上去,这次交互式rebase的过程就完美结束了,你的那个倒数第二个写错的commit就也被修正了:
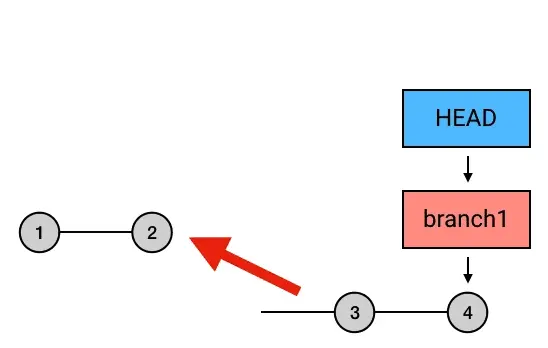
3.3.8 想直接丢弃某次提交?
reset –hard 丢弃最新的提交
1 | git reset --hard HEAD^ |
HEAD^ 表示 HEAD 往回数一个位置的
commit,上节刚说过,记得吧?
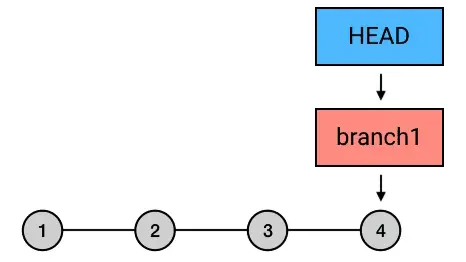
用交互式 rebase 撤销历史提交
操作步骤与修改历史提交类似,第二步把需要撤销的 commit 修改为 drop,其他步骤不再赘述。
用 rebase –onto 撤销提交
1 | git rebase --onto HEAD^^ HEAD^ branch1 |
上面这行代码的意思是:以倒数第二个 commit 为起点(起点不包含在 rebase 序列里),branch1 为终点,rebase 到倒数第三个 commit 上。
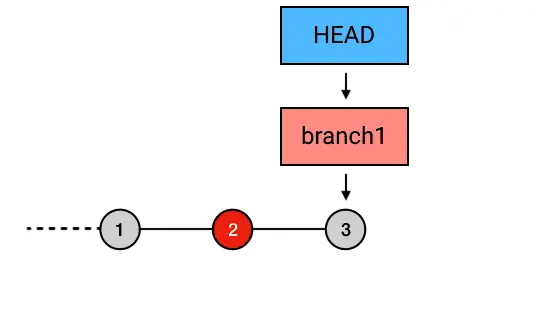
3.3.9 错误代码已经push?
有的时候,代码 push 到了远程仓库,才发现有个 commit 写错了。这种问题的处理分两种情况:
出错内容在自己的分支
假如是某个你自己独立开发的 branch 出错了,不会影响到其他人,那没关系用前面几节讲的方法把写错的 commit 修改或者删除掉,然后再 push 上去就好了。但是此时会push报错,因为远程仓库包含本地没有的 commits(在本地已经被替换或被删除了),此时直接使用 git push origin 分支名 -f 强制 push。
问题内容已合并到master
- 增加新提交覆盖之前内容
- 使用
git revert 指定commit它的用法很简单,你希望撤销哪个 commit,就把它填在后面。如:git revert HEAD^
上面这行代码就会增加一条新的 commit,它的内容和倒数第二个 commit 是相反的,从而和倒数第二个 commit 相互抵消,达到撤销的效果。在 revert 完成之后,把新的 commit 再 push 上去,这个 commit 的内容就被撤销了。它和前面所介绍的撤销方式相比,最主要的区别是,这次改动只是被「反转」了,并没有在历史中消失掉,你的历史中会存在两条 commit :一个原始 commit ,一个对它的反转 commit。
3.3.10 reset:不止可以撤销提交
1 | git reset --hard |
1 | git reset --mixed(或者不加参数) 指定commit |
3.3.11 checkout:签出指定commit
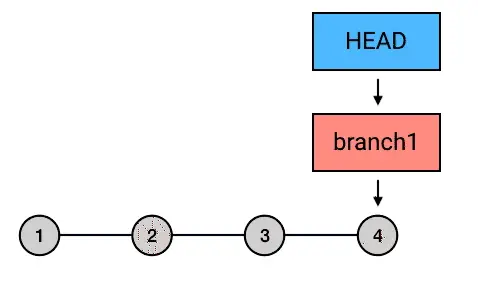
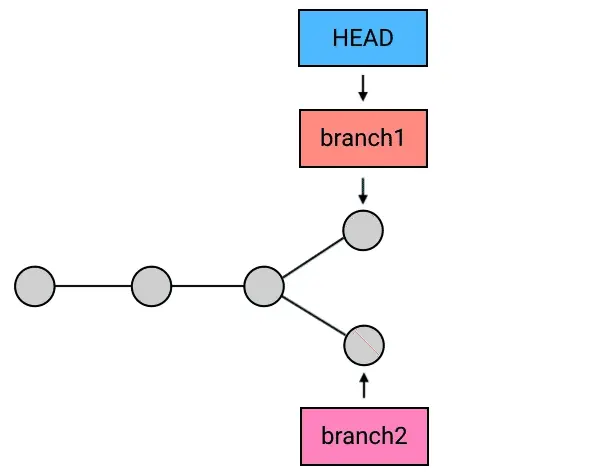
checkout的本质是签出指定的 commit,不止可以切换 branch 还可以指定 commit 作为参数,把 HEAD 移动到指定的 commit 上;与 reset 的区别在于只移动 HEAD 不改变绑定的 branch;git checkout --detach 可以把 HEAD 和 branch 脱离,直接指向当前 commit。
4. Git 命令清单
一般来说,日常使用只要记住下图6个命令,就可以了。但是熟练使用,恐怕要记住60~100个命令。

下面是我整理的常用 Git 命令清单。几个专用名词的译名如下。
- Workspace:工作区
- Index / Stage:暂存区
- Repository:仓库区(或本地仓库)
- Remote:远程仓库
一、新建代码库
1 | 在当前目录新建一个Git代码库 |
二、配置
Git的设置文件为 .gitconfig,它可以在用户主目录下(全局配置),也可以在项目目录下(项目配置)。
1 | 显示当前的Git配置 |
三、增加/删除文件
1 | 添加指定文件到暂存区 |
四、代码提交
1 | 提交暂存区到仓库区 |
五、分支
1 | 列出所有本地分支 |
六、标签
1 | 列出所有tag |
七、查看信息
1 | 显示有变更的文件 |
八、远程同步
1 | 下载远程仓库的所有变动 |
九、撤销
1 | 恢复暂存区的指定文件到工作区 |
十、其他
1 | 生成一个可供发布的压缩包 |
